Saturday, December 28, 2013

Nugget of lost awesomeness

I was published!!!

In the November issue of Miniaturas.  Madelva contacted me some time ago and asked if she could publish Mt. Ollopa Lodge in an issue.  There isn't much of a write up, since I am not really a writer and I am terrible at righting about my successes (case and point, here)  BUT, my work is there, in pictures, lookin' all SLAMMIN' y'all!!!!!


It was a nice addition to the end of the year.

The Eclectic Tennyson, from this years Undersized Urbanite contest, will be in an issue this Spring... since it is a very springy house.  :)

And that is my next build, and probably only competition next year-The UU2014.  I have seen the next Creatin' Contest house and I am not in love.  I will look at the Spring Fling, but I think that I will concentrate on the kits I have at home right now.

Although, I did just have a fabulous idea for a tower.... :D

Friday, December 27, 2013

Details Into the Barber Shop...

So, I said I would do a Christmas post.... but I have over 400 pictures to sift through.  HA!  James got me a remote for it this year, so I went a little nutso with it.  Anyway, I am so scattered this season with this year being soooooooo hectic.... Emotional turmoil started it, a huge job opportunity over the summer, vacation with the kids, financial woes, two contests... and that's just the tip of it!!!

Anyway, James also got me an external hard drive, so I snagged all the pictures from the computer and can now show you detail shots from the barber shop!!!  As emotional as this build was, and as critical as I was of myself, I absolutely ADORE this build.

Let's do a little walk through.... These are in no particular order... because that's how I roll.  :)  All the pictures are clickable to see a larger one!

The attic.  The attic is made up of scrap wood boards from the Spring Fling kit.  The roof parts were cut down to make a mansard roof (like on our real life building) and then the inside was painted Coffee Brown by Americana.  The top portion is foam core board, and I left the inside white to reflect light better.  There is no lighting up here!  Accurate to history, the attic is insulated with sawdust and shredded paper.  They also used hair, but I think there is a line that I do not want to cross there...  ;)  

In the very last moments of construction, I made tiny mice to go in the attic.  These came about because some of the painted sand fell into the attic and looked a bit like mouse droppings.... apparently, I'm okay with this line.  HA!

I scoured the internet and library for the fronts of Time Magazine... the only 'zine I think you would find in a male dominated shop of the '20's.  Now, they are all from different years, but still pretty cool.  The table is scratch built and the two pieces of paper on the far right are real ads from the time for hair tonic and shaving cream.

Chrysynbon clock and phone kits.  This sort of clock was traditional to the time period, but barbers would also have the face of the clock inverted so that time would be seen correctly in a mirror!

There are several vintage items throughout our RL shop, and the one most frequently seen is a fishing pole and fishing gear.  This is the one item that is probably NOT time period correct, but placed the directly in memorial of our loved one.  The photo's are from the 1920's.  The street actually from here in FL somewhere, but not sure where.  The coat rack is from the same kit as the clock and phone.  The window frame is made from layers of mat board glued together.

A vintage sanitizing station!  Clipper oil and talcum powder up top, along with a shave mug and brush.  Scissors and comb go in the sanitizing area, awaiting the next customer.  Oops!  Two lights are out on the vanity!  Must ad light bulbs to the list for the trip to the General Store.

Vintage haircut chart and time accurate prices!  Wish I could get my hair cut for under a buck now!!
The hat and coat are just shaped pieces of grey fabric that I put up there at the last minute.  I wanted a scarf, too, but time crunches got me!

I LOVE the color pallet I chose here.  It looks so timely.  And the warm glow cast from the lights makes it seem cozy and comforting.

A broom and a mop and a dust pan full of hair!  The dust pan is made from paper and a toothpick and the hair is cut from a water color brush. :)

A scratch built shoe shine station with real leather seats and backing.  What a pain to build, but oh so very worth it.  The papers in the seat were found online and at the library.  They are famous headline from the 20's.... Wallstreet crash, prohibition and Capone arrested.  :)

Another angle of the counter filled with goodies.

Probably one of my favorite things to build in the bunch!  This towel steamer is made from card stock, a faucet and two button maker caps. All assembled and then painted with Crown Jewels high pigment silver paint.

These vintage sinks were found on ebay and to my extreme luck, I even found 3!!!!  They are heavy though!  Very solid.  The tools on the sinks are laser cut metal that I painted.  They were originally in brass.

Wanted!  Prohibition breaking scum!  The coach lights on either side of the door are accurate to our RL building, thought I left them in brass to be accurate to the time.

The wrought iron decor in front of the windows is also accurate to our building.  It is just now occurring to me that I forgot  to paint off the plasticy sheen on them though.....

The leaves are from a mini garland.  I  just rubbed them off and let them fall where they may.  The whole drive area was constructed out of wood putty that I sculpted and manipulated to look like tons of mud and grime over herringbone brick road.  Also, I used coats of Triple Thick in areas to look like puddles!

I love shots like this.
Barber chairs, in all their glory!!
And that's all there is to it. I think I have a few shots of the 'work in progress' that I can share later on.  Hope you all had a marvelous Christmas holiday.  :)

Wednesday, December 25, 2013

Merry Christmas!

Just squeaking this in under the wire!!  Had to spend the whole day with family today and yesterday, and now, at 11:43, I am finally done!  I will post about our Christmas, tomorrow, I think, and then continue on in the pool house and barber shop posts.  I hope all of your Christmas' were grand.  :)

Here is a little scene to round out the season.


Merry Christmas and a very happy new year to all of you.  ♥

Monday, December 16, 2013

Creatin' Contest 2013 Entry: Bob's Barber Shop

I was going to share more Pool House stuff with you, but my computer up and died... and all the pictures are on there....  When I get a new computer, I will also be getting an external hard drive.... Oi.

So for now, I would love to share with you what I have been working of for the last 6 weeks!  I only have a few photos (that I luckily emailed to friends to get their opinions...) because the computer has all these pictures, too.  Bah.

Presenting, Bob's Barber Shop-a step back in time.  This barber shop was modeled after the one that is owned by my inlaws, and where my husband works.  The exterior is very close to the building we own and the interior was fashioned after a vintage 1920's barber shop.  I started this project as a gift for my father-in-law, but with his sudden passing, it turned into a memorial for him.  With all the turmoil going on, my family, the kids, summer, school, Spring Fling, illustrating and more, I didn't really get a good start on this until after Halloween.  Aside from the floor, brown wallpaper and the mirror facade, everything has been done in the last 45 days.  Yes.  I slept... I'm sure of it.

There were moments that I was certain I wasn't going to finish in time.  The clock and calendar seemed to be laughing at me.  But I am the Queen of the Power Push- a couple long nights here and there and taking advantage of anytime that I would otherwise "just be sitting there," made it all possible.

Since I'm not flush with Benjamin's and there was a specific look I was trying to achieve, a lot of the contents are hand made from scratch.  This build recap will be sorely lacking in how-to pics and during shots.... I was so pressed for time, that that was the furthest thing from my mind.  But I will try to share what I can and do my best to walk you through things.


Without further adieu, here it is!

The door and window frames are made from mat board.  The brick is made with wood filler that I slapped on there and then carved the bricks in.  The roof tiles are individually cut, rolled and stacked 1 inch squares of Sculpey. 
The tree is made with the same process I have used before. The barber pole on the building is built from scratch and it lights up.  If only I had been able to make it spin!
The leaves on the ground and tree are from a mini garland.  The muddy drive is paint over wood putty and the puddles are triple thick.


I love, love, love, this picture. 

Scratch built and lit barber pole.  Made from paper, two clear marbles and plastic tubing.  The bracket that attaches it to the wall is made from scrap wood and painted to look like cast iron-traditional for the 20's.

Inclusive interior shot.  Tons of handmade things!  The attic has a floor with mice and shows the historically accurate materials for insulation- sawdust and shredded paper.  Horse hair was also used, but... eeewwww.


Counter was built from scratch using acetate from a package and wood scraps from the Pool House.  The register was gifted to me, by April, and was assembled and then painted.

Lights are out in the vanity!  This was just a happy accident that brings a little more realism to the space.  The green things on the wall are sanitizer boxes-made from paper.  And the big silver thing (detail shot to come later) is a towel steamer-also made from paper.

These chairs were a bit of a challenge to figure out.  But utilizing the things I have learned from Kris over at 1inchminis, I figured it out.  They are constructed mostly from paper and mat board. Styrofoam makes the cushions and I even used her satin/silk to leather tutorial to paint the seats.

A fun back shot through the window, makes it seem like you are sitting on the stool by the phone.  See the dustpan full of hair?
 
One last shot of the chairs.  So much work for just 6 weeks!
There are several more detail shots of the items in this build on the way.  Many more to come as soon as I gain access to them again.
Hope you enjoyed the brief tour though!

Monday, December 9, 2013

Altering a Dollar Tree Shelf and Painting Granite

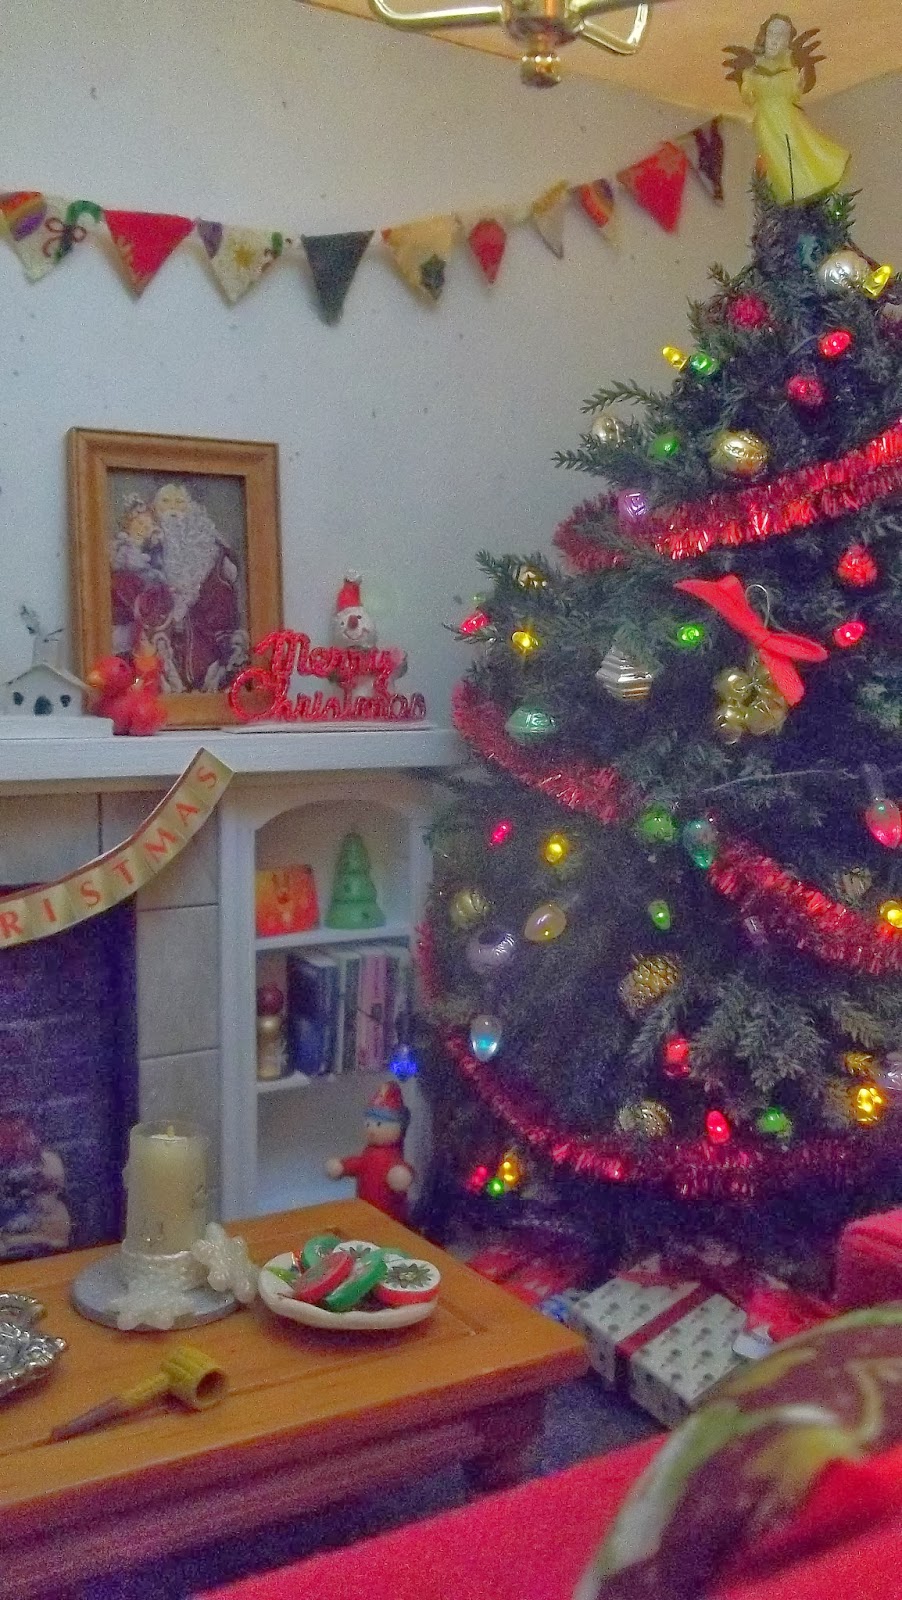
Hi, all!  I know it has been a while again, since I was here last.  Tons of family stuff this time of year and working hard on my HBS entry... hasn't left a lot of blogging time!

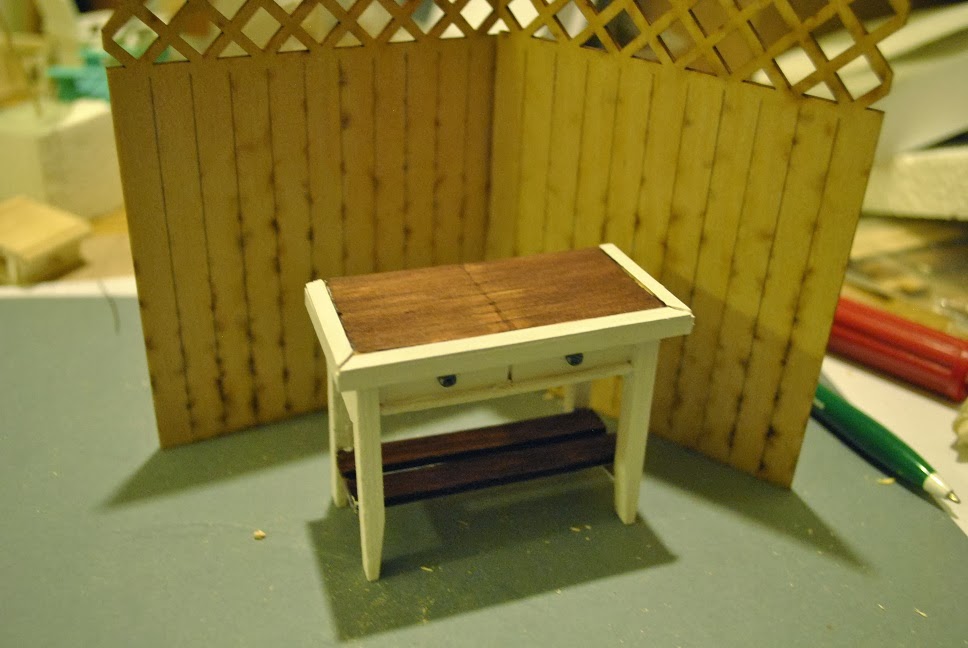
This post is to let you know how I made the little table by the front door and how I painted the kitchen stuff.  There are no pictures of the actual island build process since I was really just winging it....

Start off with a plain dollar tree table. Some stores carry the unfinished ones, and some carry the less than desirable red finish ones.
 You will take your mini saw or other cutting blade, and cut in the already scored drawer line.  Go all the way through, on both sides of the middle section.  Be sure to hold your blade at a 90 degree angle to minimize the need for corrections.
 When you are done cutting, this is what you will have:
 Discard the middle section and then glue the two ends back together.
 There was a bit of a gap, so I filled with wood filler and then sanded smooth.
 Now, decorate your table as you like.  For mine, I added a bottom shelf, scored the top, and then added a coffee stick frame around the edge-eliminating the bevel.  The knobs were pulled out with pliers and replaced with glass beads.

 Over at 
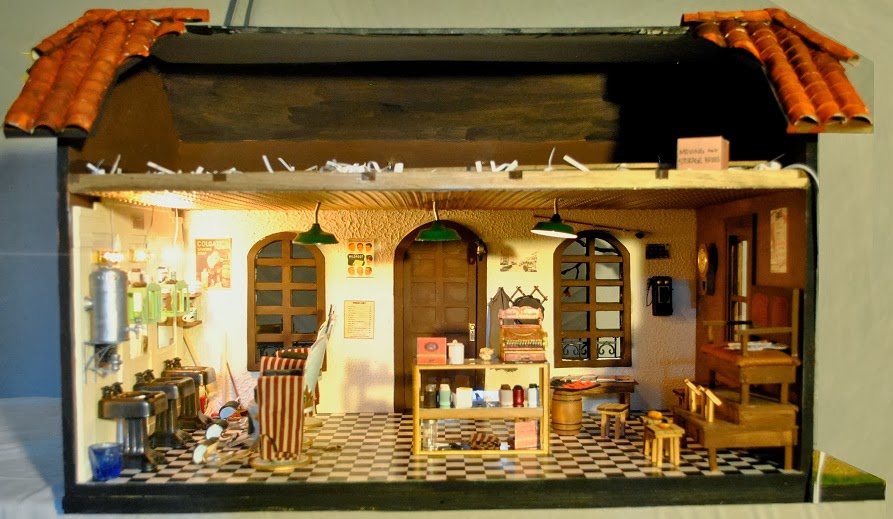
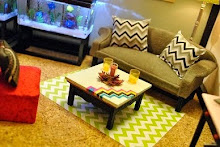
1inchminisbyKris, there are a zillion different tutorials for how to make things out of card stock, mat board and wood glue.  She has a kitchen plan that you can build, but I wanted a specific counter, so I drafted this one up.  None of the doors or drawers work, and I left off hardware.  My RL house just has these little indentations in the tops to pull drawers out and open cupboards.  It offers a clean look.  The whole structure, minus the counter and bar, is made up of 4 layers of 60# card stock. The counters are two layers of mat board.  The second layer was cut slightly smaller and then they were sanded together to get that rounded edge.
 Painting these counters was fun, but messy.  The cabinets and shelf are Vanilla by Americana, while the counter is a hodge podge of colors.
 To achieve this look, I first coated the counters and backsplash with a solid coat of a mixed taupe color.  Let it dry and wet sanded it with automotive sand paper-extremely fine. Then it was a process of fling some paint, dry, wet sand....I did this until I reached a pattern in the "granite" that I liked and then did one final wet sand.  The last steps were three coats of triple thick, with sanding in between.
 The counter tops are so smooth.
 Finally, the sink that I added in here, was just the perfect size piece of bubble plastic from a miniature that was purchased for this build.  Always be on the lookout!  I cut it out, sprayed the underside aluminum and then added a drain with pain on the inside.  Ta-da!

There is only one week left for the HBS Creatin' Contest 2013, and I am working hard to finish in time!!!  I have until Saturday afternoon, with some tweaking and pictures on Sunday, submit on Monday!  Eeek!!!