Tuesday, August 31, 2010

Happy Birthday, to MEEEEEEE!!!!!


Agh! I am 25! If I had the cash, I would totally go rent a car. An AWESOME car, just for the sake of being in an awesome car. Bwahhahahaha! So, birthday celebration started off with gift from DHM... On top of dollhouses galore, I got $50. I very quickly rushed out and got stuff to help me enjoy my day "off" tomorrow. (DH is tending to the kids all day, WAHOO!!!) I got: a sander and sandpaper, new blades for the utility knife, tile samples, couple sheets of lauan plywood, Glidden paint samples, fabulous black fabric, wood to make a shelf, and a dremel doodad. Top that off with the gifting of loads of books, fabric, trim and FIMO from my good friend Marilou, and I am one happy clam dedamn! Sure am!

When I got back, James and I enjoyed a quiet dinner (Marie Calender's Chicken pot pies) with drinks (good ol' young person rum and coke) and dessert (brownies with ice cream). I am hoping to finish out the night with a bit of minis and a movie, maybe.
Tomorrow, I am going to mini the day away! The plan is to knock out the exterior of the Highland. French doors, balcony, flower boxes, garage door, front door, porch and roof. LOL. We will see how that goes. I desperately need to clean off my desk though. It looks just like it did a few days ago. Come on, Lyssa! Get off that keester and do it! I have high hopes for the day though.


So, we will see how it goes.

Sunday, August 29, 2010

Weekend #8: Trimming, what a PAIN!

This poor house was actually spray painted at one point, so everything was sort of painted together and large drips were everywhere.... And it appears that they used a mixture of glues on the outside. Some places it held [b]really[/b] well and in others, it was clearly falling off... This obviously meant that they should NAIL the siding onto the house!!!

OMFG!!!!!

So, nearly everything on the exterior was obliterated and in desperate need of replacing. I am grumbling about this so fervently because combine all that nonsense with my lacking existence of cash (where's Robin Hood when you need him?!) and absolutely no proper trim or window casings and I discover that I am reduced to using craft sticks. Doh!

This doesn't sound like a big deal, but craft sticks are only so long... so this means measuring: BORING. Cutting: BORING. Sanding: BORING. Gluing: BORING. Clamping and waiting to dry: BORING TIMES A BILLION. Filling with wood filler: BORING AND MESSY. Waiting for wood filler to dry: BORING Sanding: OMG. BORING BEYOND BELIEF. (BBB) *goes to bang head against desk... but desk is still messy, so we opt for face first flop on the bed*

Stages of boring:


Finally get all that done with and then we can pick out the color. I decide to make one up because nothing I have is good enough. I end up with a mix of Nutmeg brown, Crimson red and Mars black. This all turns up a chocolate brown with just the faintest hint of red too it. I heart it. Now round and round the trimming we go with the paint. By the time I had finished the last part on the house, the first part was dry and ready for a second coat. I ended up doing 3 coats on everything but the floor for the porch. It will eventually look like worn wood planks. The results of the dark color are amazing and I am very pleased!

So... maybe boring is worth it?!


Not ready to be done yet, I moved onto the garage portion of the house. This got it's own mixture of gray for the floor, a bluish gray for the walls and a wash of the custom brown to make it "dirty." Then, I went in and made oil stains and topped off the stain area with some fresh spilled gross-tastic oil. Otherwise known as Glossy Black. :) The door got some white and the final wall got a bit of paper to add a little punch. This will be filled with all sorts of garage stuff!


So the next step is to do the garage door and fill the garage. The windows need to be placed and the doors need to be sanded, trimmed, cut and painted. I am thinking about making them a really fun, off the wall color. I also need to attach the balcony (after some French doors are made) and deal with the sun porch over the garage. Last touches will include shingles and landscaping, and then it'll be back onto the interior!

Friday, August 27, 2010

I've Gone Etsy!!

I just opened my own store on Etsy! The game plan for it is to make OOAK miniatures for other people at an affordable price.

All the time, I am seeing mini's online that I absolutely love.... but then nearly have heart failure from the price tag, which is quickly followed by sadness. I realized, I am a fairly crafty person and I think I can make these things myself. And you know what, I could! I did. And now I have them available for others to purchase from me. I am going to try really hard to never sell anything over $25 and I will happily take custom orders.

All that is on there right now are two sets of quilts and pillows, as is the Xbox. I plan on eventually adding some furniture, pillows, the paper clay toilet, the scratch built stove, the easel (in both clean and "used" states).... I will also have smaller items like paint tubes, brushes, the smock.... basically, anything that I have talked about making on here, I will duplicate and sell for your pleasure!

I love doing this to help out other miniaturists AND I think it would be a great way for me to bring in a little extra money for the kiddos. So go take a look!

www.LyssasBudgetMinis.etsy.com

August 25th: An UGH and a WAHOO!!!

So, my ugh is I have uncharacteristically let me work area get out of hand:


This one, above, is taken from sitting on my bed! I literally, work in a corner and I need shelves above the desk, I think.


How is one supposed to mini in those conditions?! I think I have gotten to a point where I have too much stuff for this little area... and to think that we just went and got a bunch more yesterday. *sigh* Hopefully, I will muster up the gung ho needed to fix this disaster!


My wahoo is that I finally painted the Xbox! Check it out!


James loves this little thing! I think it would turn out a bit better if I used colored Sculpey or Fimo, but what I can afford is the one big block of white. Maybe in the future!

Tuesday, August 24, 2010

Weekend #6: August 21st ~ Down the rehab highway from Drab

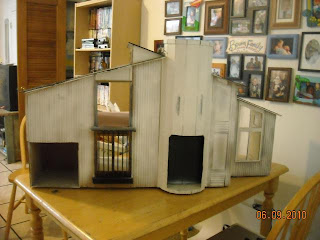
...and on it's way to FAB! This past weekend I worked on the outside of the house. In order for you to see the true transformations, you will need a before picture. This is what the house looked like when I picked it up here, in Gainesville, in June.


She looked pretty rough, huh?

No combination of letters can tell you how excited I was to get this house! I remember, as I struggled to get her off the porch and into the back of my Jeep, I was muttering to her about the obvious abuse, neglect and rush-job she had been through. Her siding was glued on in gobs AND nailed in. The nails had to have been driven through the glue while it was still wet. They were nearly impossible to get off and it became clear that all of her outside would need to be replaced after there was no way to get around the gouging and breaking.

At the beginning of July, James worked hard with me to get the interior (full of nasty smelling carpet and mouse droppings) cleaned out and the exterior stripped. I tried to remove as much of the siding as possible and ended up having to reinforce a wall on the inside. Here is our girl prepped to be smoothed out:


The only thing I could think to use to smooth out the exterior was a whole bunch of joint compound. That's what she got! I covered every blemish; filled in every crack, smoothed over all the bumps and then textured it all on Saturday night:


Sunday morning, I got up and worked on the tower. From the first time I looked at it, I knew this house was supposed to have a stone tower.... this was BEFORE I saw that every other Highland has a river-rock tower!!! There are currently two others in production on Greenleaf Forum. I know one has the stone and I am curious to find out if Jackie will be doing the same. This was a long and messy process and I had to keep slopping the compound on to accommodate for the size of the rocks. Even though it was time consuming, I really like how it turned out:


Later that night, the rest of the house, the dry parts, got a coat of interior house paint from Valspar. I'm not sure what color the paint is called. It was on the clearance shelf, so we will just call it Discounted Brown. It's kind of a taupe. Reminds me of makeup foundation. The color suits her!!


She is currently getting new trim around all the windows, to be painted a darkish brown color. I think it will give it a nice pop. No pictures of that yet... it is a long, boring process cutting sticks for trim. *sigh* She can also look forward to getting a balcony off the den, which will feature one, maybe two, comfy chairs; a small table and a telescope.

There will also be a, and maybe 4, window box(es) on the bottom floor. I really want to put the original deck on the front, but as you can see, she is out of room!!! The empty space will be a garage and will feature a type of door that I have seen down here a lot. They will need to be scratch built. Yippee! The space above is for a second floor deck. There was one of these on the house that I grew up in. My parents covered nearly the entire thing with potting plants of tomatoes and 9 gazillion different types of peppers and chilies.

Guess I better hop back on it!! I have been a little neglectful of it for the past few days. Trim is so dull!

'Strange Men in Pinstripe Suits' award

This is new to me! Brae, of Otterine.com Blog, nominated me for this award for my unique take on miniatures... and our strange ability to be doing what seems to be nearly the same thing, at the same time.

Thanks, Brae! I appreciate your compliment. :D

Strange Men in Pinstripe Suits Award is orginally from Cate Gardner to honor her forthcoming story collection 'Strange Men in Pinstripe Suits' due out this October. There is a contest with prizes involved...always a good thing. Now on to the business of it all...

++++++++++++
The 'Strange Men in Pinstripe Suits' award is given to only the strangest of folk, and as the recipient of such you are deemed very strange indeed. Congratulations.

Now you must go forth and celebrate the strangeness of friends (and strangers - strangers are always allowed) by nominating blogs run by strange folk. *Beware, some people don't like you to refer to them as strange…Try to avoid them if possible.

Some rules:

1. Add the logo of the award to your blog post.
2. Add a link to the person who awarded it to you (don't mess with strange people).
3. Nominate seven other blogs telling us why you think the recipient is strange enough to deserve the award.
4. Leave a message for those nominated on their blogs.
5. And, if you email catephoenix(at)gmail(dot)com and tell her you've received the award for your strangeness, she'll enter you in the biggest kick-ass Strange Men competition ever. Details over at strangemeninpinstripesuits.com (click on the award link on the home page).

I'm not sure who I would nominate outside of three that have already been covered!

Off to Greenleaf to get my mini friends.... hold on.

Okay, my implications of strangeness are also meant as a compliment!!!

1) Dorothy B of Dollhouse Construction for her soaring talent and the talent just under that of underestimating her stuff. The Princess Anne she is working on is wonderful! Strange that she questions her talent.

2) Paula, from Greenleaf blog : I hardly ever see her on there, but every time she posts something she has done, it is a punch in the face of awesomeness. Strange that she always comes in with a bang. I love it!

3)Kathie B of KathieB's Mini's. Her neurotic attention to detail is strange. And WONDERFUL!! Have you SEEN her quilt shop? Perfection in it's finest representation.

4) Kim over at Little Rosey Posey is wonderfully strange for her completely developed storyline behind her house. LOVE it!

5) Nikki over at Witch and Wizard Miniatures has already gotten one. I think this means she is Uber Strange. ;)

Then I would include those that have already been covered: Brae: totally my mini soul counterpart. It seems we copy one another all the time, though not really copy since we are doing things simultaneously without our knowing. Strange indeed, the great minds we have!! Casey's posts are always a little offbeat, but they make my morning! Best way to start the morning is with a cup of coffee and a laugh from Casey and Tessie. Grace gets it for being freakishly AWESOME at making books and other teeny things.

Now off to tell you all how totally STRANGE I think you are!!

August 18th and 19th...and maybe the 20th: BATHROOM!


I spent these couple of days tending to the bathroom. Oh MY what a chore that was! When I first started on this house, the area that I had designated for the bathroom was what suffered the most casualties. I *oops* broke a window and *oops* punched out the front wall trying to remove the interior wall. It was a total pain! I have the original pictures somewhere in cyberspace... or on a disc. James recently messed with my computer and everything got put on a disc for back up. I will track them down when I am totally done and do awesome Before and After shots.

Anyway, I had to reconstruct most of this room, which required scratch building two walls. Two walls became three when the house piped up about wanting a roof deck over the garage. *sigh* So there was lots of cutting, measuring, sanding... and then a slew of swearing and fit throwing when it didn't fit properly. And then some MORE of it when I knocked the wall down and it fell behind the dresser that the house sits on. ARGH!!!

After catching my breath, and retrieving lost wall, I managed to get the back/front wall installed after I papered it. Before I could settle on a construction for the other wall, I needed to have a tub and toilet in place for layout purposes. Issue. I didn't have a tub or a toilet. Clearly, in Lyssa Land, this meant make it myself! I had been looking at tubs and toilets online to purchase, but couldn't find one that I not only liked, but could afford. (Large reason I started my Etsy site www.LyssasBudgetMinis.etsy.com)

I decided to tackle the tub first. I had know for quite some time that I wanted a garden tub or some kind of low back wall. I love the idea of being able to soak in the tub with a good book in hand and a glass of wine in reach. I started off by choosing the shape of the tub. I went with the corners-hacked-off-the-square shape, which allows the tub to be placed in a corner and accommodates a step.
Then I cut out a "tub" shape in the middle of that. I went with normal oval and offset it so I would have a shelf area for mini wine and books. :) Next task was to measure the sides of the main shape and construct the boxy look to the tub and the step. I chose the same $.99 Home Depot vinyl marble tile that I used on the floor for the top. This was craftily cut at a corner to put the oval in the middle of it and then the seam was super glued back together. The faux marble was then placed on top of my tub "box." I originally wrapped the tub with a blue wallpaper scrap just to cover up all the seams from the foamboard.

I tried to use cold porcelain to make the actual bathtub part, but that was an epic sticky failure. It made a total mess of the paper and I ended up painting it glossy black. The tub part has since been made with paper clay. Which brings me to the next part of this story!

The TOILET!

I was just messing around when I made this and I was amazed when people actually thought it looked good! I used foam board, paper clay and Aleene's tacky glue to make it. I made a basic toilet shape out of the foam board and then glued it all together. When it was dry, I wrapped it in paper clay, taking care to smooth it out. When it was dry the next day, I painted it using Glossy White and Glossy Black. The flusher was painted silver.


I WILL do a more extensive tutorial at some point, pictures included. :0

After I was done with those, I finished up the other wall, choosing a nice Asian print that went well with the red that I used. I still need to make sinks, but I think the end result (so far) is pretty awesome!


Some shots of the final product:


Sunday, August 22, 2010

Need typing motivation!!!

Alright, I have two huge posts to write: the adventures of making bathroom and its...erm, furniture.... and redoing the exterior. Now who is going to motivate me to do so? Lack of commenting makes me think no one is reading!! I am typing to myself. *sad face*

I will try to tell the thrilling tale tomorrow after coffee. Holy crow! Look at all that alliteration! Mama would be proud! :P

Thursday, August 19, 2010

August 17th: Fun art accessories and an XBox

I spent some time on Tuesday making extra little things to go in the craft room. Paint tubes, watercolor box, baskets, paper towel, pencils, an apron.... little things here and there.


And as a special treat for James, I made a tiny XBox 360, complete with controllers and headset. They still need to be fired and painted, but I think they look great already! James is very happy with them. I will have to get printies of the games, too.

August 16th: An easel worth your drool!

On August 16th, I sat down at my desk staring at a pile of skinny sticks, craft sticks and various pieces of scrap wood. My tiny resident artist needed an easel and I had the monumental task of creating one for her.

While mulling over how to do this, I first created a stool. This was done by using some square pieces of wood, a dowel and 3 toothpicks. From the stool, I was able to gauge the height of the easel better. I started fitting some pieces together, just placing them together on the desk when, VOILA! It all came together in my head and out came the best easel ever! I also made a rag and palette to go with it, two essential accessories to ANY artist.

Here is the unfinished product:

I am thinking about making a tutorial for my fellow miniaturists over at the Greenleaf Forum.

I then stained it with Plaid Mahogany stain and gave it some paint splashes. The only time I have ever seen a spic and span easel is on display that the store!! To authenticate the rag, I used it to help make the mess!


And then, for even more realism, I ever so carefully replicated a painting that I had done a few years ago:


Overall, I am very pleased with the results! And it looks great in the room with all the art stuff.

Sunday, August 15, 2010

Mid August futzing

On Wednesday, I just spent some time making little accessories for the craft room and I followed a tutorial for a Paper Towel Holder : Ms. MiniLovers Tutorials She has several tutorials for little items and they are all FANTASTIC!!! Other than Gabrielle's stuff, I also made erasers, mini drawings, a stretched canvas, canvas rolls, piles of cardstock, a bin of scrap wood, and piled up some old thread to make tiny spools of thread later on. Here is what we came up with:


August 10th: An hour of my Tuesday


Look what you can do in an hour with some scrap wood and cardboard, craft sticks and pen parts! I was inspired to do this after someone on the Greenleaf forum scratch built a stove in 1:24. I was like, I can do that! And I even thought I could do it with an opening door and drawer. I still have yet to put the knobby doos on it and the interior of the oven has been painted a shiny metallic black color. It occurred to me that the inside of the door and drawer would also need to be painted this way. At the moment, I am trying to figure out what would make a good rack. I'm assuming some thick paperclips will need to be bent just right.

In the future, I would like to put one of these in a house that has been wired and run a light to it to make it appear that it is baking something yummy!!

August 9th: Tackling the kitchen, finally!


This house has always wanted a loud and bright kitchen! Today, after I was sure that the ceiling was firmly attached, I set out to finish up the kitchen. First thing was to do the ceiling. It got a good coat of joint compound and smoothed out with one of those credit cards you get in the mail 5 times a week. While that was drying; I measured, cut, sanded and painted all the trim. I went with a close pink shade that is seen in the striped border paper. It is a combination of Christmas red, neon pink and Shiny white.
After that was dried, it was secured in place with tacky glue. I love that stuff!

Once all that was done, I decided to tackle a couple of lower cupboards. I chickened out on giving them working doors though, but they still turned out pretty good, I think. Besides, I redeemed myself later. ;)


These counters were made with some scrapwood, mahogany stain and wallpaper scraps that happen to resemble marble. There are 5 pieces of luan plywood that were cut to form the main structure. Once assembled, it is 3" high x 4"wide X 2" deep. The cupboard doors and drawers are made from some scrappy pieces of basswood that I had. I had purchased a bag of squares and rectangles some time ago for inane projects. Once everything was all glued together, I stained it with Plaid's mahogany water based stain and then washed parts of it with sky blue. I really like the effect this achieved. The countertop itself is made from some RL wallpaper that I have. It happened to look like marble and looked wonderful in the kitchen. I cut and folded it to size and secured it with tacky glue. The backs of the counters are left open, in case I want to make working parts later on down the road.


I made another one and bashed the top of a Micheal's hutch onto it and made my own hutch. This will end up holding all the dishes, I think. I am currently thinking about adding a ceiling pot holder thing. Ya know, where the pots hang down on that big brass or iron contraption from the ceiling? I've always wanted one of those in RL! And like I say, if you can't have it big, make it mini!!!

The upper cupboards are attached with a poster material that allows me to move them all around. Good thing, too, since I can't decide on a layout!!!